WordPress Integration
Connect your self-hosted WordPress site to publish content generated in Asky directly to your WordPress blog, pages or custom post types, and to refresh existing pages in place.
Publishing to WordPress is available on Scale and above.
What You Get
Connecting WordPress enables:
| Feature | Description |
|---|---|
| Content Publishing | Publish articles and posts directly |
| Post Types | Posts, pages and your custom post types |
| Categories & Tags | Assign WordPress categories and tags |
| Featured Images | Add a featured image, uploaded to your WordPress media library |
| Status Options | Publish or save as draft |
Prerequisites
Before connecting, ensure you have:
- Administrator or Editor access to your WordPress site
- A self-hosted WordPress site with the REST API enabled
Self-hosted requirements:
- WordPress 5.6 or higher
- REST API enabled (enabled by default)
- HTTPS enabled
- Application Passwords feature (WordPress 5.6+)
Asky sets up structured data for you when you connect: it installs the free Code Snippets plugin and adds a small snippet that renders JSON-LD on your pages. See Schema.org Structured Data Setup below.
New WordPress.com connections are paused, so new customers connect a self-hosted site. If you already have a WordPress.com connection, it keeps working and stays on your Connections page.
Connecting WordPress
Navigate to Connections
In Asky, click your name at the bottom of the sidebar and choose Connections.
Find WordPress.org
Locate the WordPress.org card. It is the card for self-hosted WordPress.
Click Connect
Click the Connect button.
Authorize Access
Self-Hosted
Self-hosted WordPress connects via Application Passwords: a token you generate in your WordPress admin and paste into Asky. Asky never sees your real WordPress password.
1. Generate an Application Password in WordPress
- In your WordPress admin, go to Users → Profile
- Scroll down to the Application Passwords section
- Enter a name (for example
Asky) - Click Add New Application Password
- WordPress shows a one-time string like
xxxx xxxx xxxx xxxx xxxx xxxx. Copy it now. You cannot view it again after leaving the page.
2. Fill in the Asky connect form
| Field | What to enter |
|---|---|
| Site URL | Your site’s full URL with https:// (for example https://yoursite.com), with no trailing slash and no /wp-admin |
| Username | Your WordPress login username (the one you use at yoursite.com/wp-admin), not your email |
| Application Password | Paste the string from step 1, including spaces (Asky strips them automatically) |
Click Connect. You’ll be returned to Asky with WordPress connected.
The user account you generate the Application Password under will be the author of every post Asky publishes. They need Editor or Administrator role.
Application Passwords require WordPress 5.6+ and HTTPS. They will not work on HTTP-only sites.
Complete Setup
Asky tests the connection, then sets up structured data on your site and turns on daily crawler log imports. When the dialog finishes, WordPress is connected.
Schema.org Structured Data Setup
Asky generates JSON-LD structured data for every draft and sends it to a custom post meta field called asky_json_ld on publish. For this schema to actually render as a <script type="application/ld+json"> tag on your live page, WordPress needs a small PHP snippet that registers the meta field with the REST API and outputs it inside <head> on each post.
This is a one-time setup per site. After completing it, every future publish from Asky automatically includes structured data on the live page.
In-app setup (recommended)
Asky does this for you. When you connect a self-hosted site, Asky installs and activates the Code Snippets plugin and adds a snippet named Asky JSON-LD Schema, all inside the connect dialog. If the setup still needs finishing later, for example because the plugin was deactivated, a draft shows a Set up JSON-LD card: click it and Asky completes the remaining steps.
Your WordPress user needs permission to install and activate plugins for this to work. If it doesn’t have that, Asky tells you and a site administrator can install Code Snippets, or you can follow the manual steps below.
Structured data helps AI search engines (ChatGPT, Perplexity, Gemini, Claude) understand and cite your page correctly. Without this setup, content publishing still works, but your pages render no Asky-generated JSON-LD and miss the added AEO benefit.
The setup below applies to self-hosted WordPress (WordPress.org). WordPress.com customers need to be on a Business or Commerce plan to install plugins. The same snippet works, but lower-tier WordPress.com plans cannot run custom PHP.
Manual setup (fallback)
Use these steps only if the in-app setup could not finish.
Use a snippet plugin (don’t edit functions.php)
Editing functions.php directly is risky for non-technical users; a single syntax error can take the site offline. Instead, install a snippet plugin that runs PHP safely with a UI. We recommend either:
- Code Snippets (free, by Code Snippets Pro): the most popular plugin for this use case
- WPCode (free, by AwesomeMotive): a modern alternative with similar functionality
If you already have one installed, use it. Otherwise, either is a fine choice. The instructions below use Code Snippets, but WPCode follows the same flow.
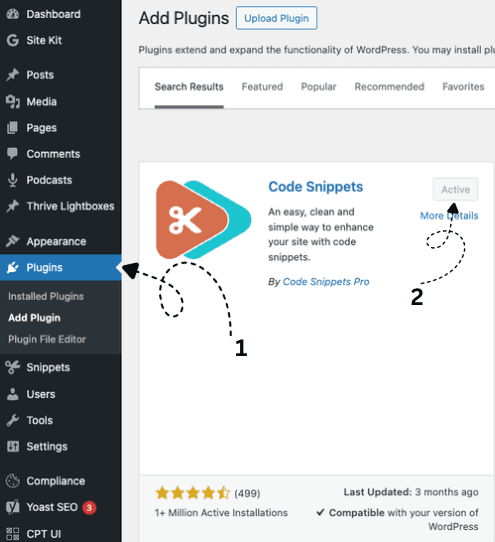
Install Code Snippets
- In your WordPress admin, go to Plugins → Add Plugin
- Search for Code Snippets
- Install and activate the plugin by Code Snippets Pro (free version is sufficient)
Open the Snippets menu
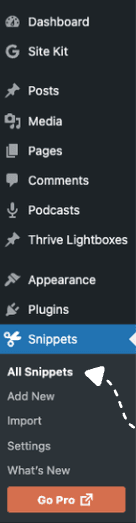
In the WordPress admin sidebar, open Snippets → All Snippets.
Click Add New
At the top of the All Snippets page, click the Add New button.

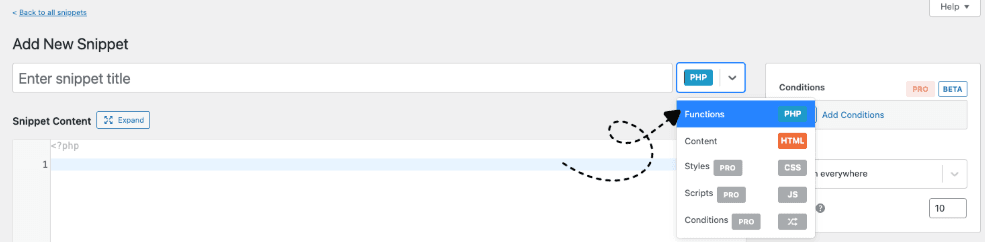
Choose the PHP / Functions snippet type
On the Add New Snippet screen, confirm the snippet type is set to PHP / Functions (the default). If you need to change it, click the type selector in the top-right of the title field.
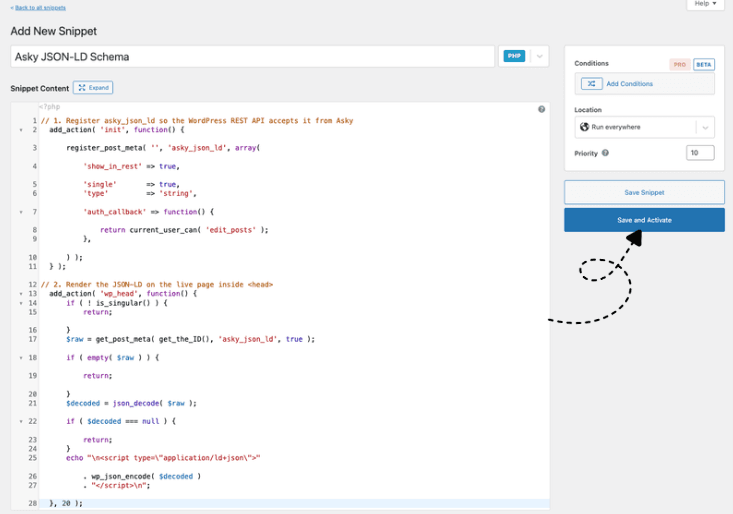
Name, paste, and activate
- Name: enter
Asky JSON-LD Schema - Snippet Content: paste the code below into the editor (do not include the
<?phpopening tag, Code Snippets adds it automatically) - Location (right sidebar): leave as Run everywhere
- Conditions: none needed. The snippet itself only runs on singular posts that have schema attached
- Click Save and Activate
// 1. Register asky_json_ld so the WordPress REST API accepts it from Asky
add_action( 'init', function() {
    register_post_meta( '', 'asky_json_ld', array(
        'show_in_rest' => true,
        'single'       => true,
        'type'         => 'string',
        'auth_callback' => function() {
            return current_user_can( 'edit_posts' );
        },
    ) );
} );

// 2. Render the JSON-LD on the live page inside <head>
add_action( 'wp_head', function() {
    if ( ! is_singular() ) {
        return;
    }
    $raw = get_post_meta( get_the_ID(), 'asky_json_ld', true );
    if ( empty( $raw ) ) {
        return;
    }
    $decoded = json_decode( $raw );
    if ( $decoded === null ) {
        return;
    }
    echo "\n<script type=\"application/ld+json\" class=\"asky-schema\">"
        . wp_json_encode( $decoded )
        . "</script>\n";
}, 20 );
The first block tells WordPress’s REST API to accept asky_json_ld as valid post meta. Without this, WordPress silently drops the value when Asky publishes. The second block outputs it as a valid <script> tag on every singular post or page that has schema attached. The tag includes class="asky-schema" so you can easily identify it in the page source and distinguish it from any JSON-LD added by SEO plugins.
Verify it’s working
- Publish any content draft from Asky to this WordPress site
- Open the published post in WordPress admin and click Preview (or open the live URL if published)
- View the page source (Ctrl/Cmd + U) and search for
asky-schema - You should see a populated
<script type="application/ld+json" class="asky-schema">block containing the article’s JSON-LD
If your site uses an SEO plugin like Yoast or RankMath, you may see two JSON-LD blocks on the page: one from the SEO plugin (typically with class="yoast-schema-graph" or similar) and one from Asky (with class="asky-schema"). This is expected and valid. Google and AI crawlers handle multiple JSON-LD blocks correctly. Asky’s block adds types your SEO plugin may not generate automatically (for example FAQPage and HowTo).
Paste the live URL into Google’s Rich Results Test to confirm the schema parses cleanly and Google recognizes the types.
Troubleshooting
The <script> tag doesn’t appear on the live page:
- Confirm the snippet is Active in Snippets → All Snippets (green toggle)
- Verify the snippet’s location is set to Run snippet everywhere
- Open the post in the WordPress admin, scroll down to Custom Fields (enable via Screen Options if hidden), and check whether a field named
asky_json_ldexists. If missing, the REST API rejected the value. Re-publish from Asky after activating the snippet. - Re-publish the draft from Content in Asky, then reload the page
The <script> tag is there but empty:
- The draft you published didn’t have schema attached. Open the draft in Asky and review the Schema.org preview before publishing again.
Articles published before this setup don’t have schema:
- Complete the setup, then republish those drafts from Content. New publishes include structured data automatically.
My SEO plugin already adds JSON-LD, do I need this?
- Asky’s schema is complementary to plugins like Yoast or RankMath. Asky generates richer types based on your article content (for example
FAQPagefor articles with Q&A sections andHowTofor instructional content) that most SEO plugins don’t auto-generate. Both can coexist.
Publishing Content
From Content
To publish content to WordPress:
Select Content
- Go to Content in the sidebar
- Click on the content you want to publish
Verify Content Status
Ensure content is in “Ready” status. Edit if needed.
Click Publish
Click the Publish button.
Select Destination
Choose WordPress as the destination.
Configure Options
Set publishing options:
Post Type:
- Post: Standard blog post
- Page: Static page
- Custom post types: Any editorial post type your site registers, such as case studies or guides
Status:
- Publish: Goes live immediately
- Draft: Saved as draft for review
Categories (for posts):
- Select from existing categories
- Or leave uncategorized
Tags (for posts):
- Add relevant tags
- Separate multiple tags with commas
Featured Image:
- Add a featured image, which Asky uploads to your WordPress media library
Confirm and Publish
Click Publish to send content to WordPress.
Tracking Status
After publishing:
- Content status changes to “Publishing”
- Status updates to “Published” when complete
- Link to WordPress post is provided
- Any errors are displayed with details
Viewing on WordPress
Published content appears in your WordPress admin:
- Log in to WordPress
- Go to Posts or Pages
- Find your newly published content
Content Formatting
What Gets Published
| Asky Content | WordPress Equivalent |
|---|---|
| Title | Post/Page title |
| Body | Post/Page content |
| Summary | Excerpt (if available) |
| Slug | Post slug/permalink |
Formatting Support
Asky content supports:
- Headings (H1-H6)
- Bold and italic text
- Bulleted and numbered lists
- Links
- Block quotes
- Code blocks
HTML Handling
Content is converted to clean HTML compatible with:
- WordPress Classic Editor
- Block Editor (Gutenberg)
- Most WordPress themes
Managing the Connection
Viewing Status
The connection card shows:
- Connection status (Connected, Expired, Error)
- Connected WordPress account
- Selected site
- Last publish time
Switching Sites
To publish to a different site:
- Click your name at the bottom of the sidebar and choose Connections
- Find WordPress
- Click Change Site
- Select new site
Disconnecting
To disconnect WordPress:
- Click your name at the bottom of the sidebar and choose Connections
- Find WordPress
- Click Disconnect
- Confirm
Disconnecting:
- Stops ability to publish new content
- Does not delete content already in WordPress
- Can be reconnected anytime
Revoking Access
You can also revoke access from WordPress:
Self-hosted:
- Go to your WordPress admin
- Navigate to Users → Your Profile
- Find Application Passwords
- Revoke Asky’s password
WordPress.com (existing connections):
- Go to WordPress.com
- Navigate to Me → Account Settings → Connected Apps
- Find Asky and click Disconnect
Troubleshooting
Connection Failed
“Authorization Failed”:
- Verify you’re logging into the correct WordPress account
- Check you have Editor or Administrator access
- For self-hosted: ensure REST API is enabled
- Try disconnecting and reconnecting
- If Wordfence is installed on the site, see Wordfence blocks the connection below
“Site Not Found”:
- Verify the site URL is correct
- Check site is accessible
- For self-hosted: ensure REST API isn’t blocked
Wordfence blocks the connection
Wordfence’s Login Security module turns off WordPress Application Passwords by default. With that setting on, every request Asky makes with your Application Password is treated as a logged-out visitor: connecting fails with an authorization error, and a connection that used to work starts failing the moment Wordfence is installed.
- In your WordPress admin, go to Wordfence → Login Security → Settings
- Uncheck Disable WordPress application passwords
- Click Save
- Back in Asky, try the connection again, or click Reconnect if it shows as failed
Your Application Password itself is unaffected, so there is no need to generate a new one. Wordfence’s firewall and login rate limiting can stay on.
Bot protection blocks reads or updates
Some hosts put bot protection in front of the whole site, including the WordPress REST API that Asky reads and updates your pages through. SiteGround’s Anti-Bot AI and Cloudflare’s bot challenges are the common ones. When it answers instead of WordPress, Asky retries from its fixed address, 77.83.51.191. If that is blocked too, Asky says what happened: either nothing was changed, or the update may not have been saved and should be checked in WordPress before you try again. A refresh that could not read the page shows its changes to copy across by hand instead of updating it in place: open Changes above the article to see the original page beside the refreshed version, copy each change as formatted text, HTML, plain text or Markdown, then click Mark as published.
To stop it happening, allow the address:
- SiteGround: open a support ticket and ask them to exempt
77.83.51.191from the Anti-Bot AI for your site, not only from the Blocked Traffic list - Cloudflare: add an IP Access rule for
77.83.51.191with the action Allow, under Security, WAF, Tools. Bot Fight Mode cannot be skipped by a custom rule, but it does not run on a request an IP Access rule has already allowed - Other hosts and firewalls: add an allow rule for
77.83.51.191in your bot protection or firewall settings - Run the refresh again, so the page can be updated in place
The AskyBot user-agent rule on the AskyBot page covers crawling only. Reading and updating your pages uses your Application Password and does not carry the AskyBot user agent, so allowing the user agent is not enough here.
Publishing Fails
“Permission Denied”:
- Verify your user role (need Editor or Admin)
- Check if publishing is restricted
- Reconnect with appropriate permissions
“Invalid Post Data”:
- Check content doesn’t exceed WordPress limits
- Remove any unsupported formatting
- Try publishing as draft first
“Connection Timeout”:
- Your WordPress server may be slow
- Try again in a few minutes
- For self-hosted: check server performance
Token Expired
If connection shows “Expired”:
- Click Reconnect
- Re-authorize with WordPress
- Connection is restored
Token expiration varies:
- Self-hosted: Application Passwords last until you revoke them
- WordPress.com: Tokens rarely expire
Content Issues
“Formatting Looks Wrong”:
- Check your WordPress theme’s styling
- Some formatting may need theme CSS
- Review in WordPress editor and adjust
“Categories/Tags Not Applied”:
- Verify categories exist in WordPress
- Create categories before publishing
- Check spelling matches exactly
Security & Privacy
Permissions Requested
Asky requests:
- Create and edit posts
- Create and edit pages
- Read site information
We do not access:
- User management
- Plugin or theme settings
- Database or files beyond posts
- Comments or other content
Data Flow
- Asky reads existing pages when you refresh them and writes only the changes you approve
- Published content exists independently in WordPress
Best Practices
- Test with draft: Publish as draft first to verify formatting
- Review in WordPress: Check formatting matches your theme
- Use categories: Organize content with categories
- Set featured images: Add one before you publish
- SEO plugins: Configure SEO settings in WordPress after publishing
WooCommerce Note
Asky publishes articles to posts, pages and custom post types. Publishing WooCommerce products, with prices and inventory, is not supported.
Multisite Support
For WordPress Multisite:
- Connect to individual sites in the network
- Each site requires separate connection
- Network admin can manage all connections
Limitations
| Aspect | Limitation |
|---|---|
| Post types | Posts, pages and editorial custom post types |
| Custom fields | Not currently supported |
| Bulk publish | One item at a time |
| WooCommerce | Products not supported |
| Translations | Language versions publish as unrelated posts |
Next Steps
- If your pages are built with Elementor, read Elementor pages for how updates reach them
- Connect Webflow for additional publishing
- Publish other languages from Translations